The Road to Hamlet: London Underground & Public Transport
Now that you’ve arrived in the Capital, what’s the best way to get around? There are several choices, other than your own two feet!
Here’s your first PRO TIP: carry a paper map, just in case. Batteries on phones will die, or you may run out of data allowance, or you may just want to keep costs down.
And your second PRO TIP: allow extra travel time. Getting across or through London takes longer that you may realise. The place is sprawling, busy, and there will probably be delays somewhere!
Remind yourself of the locations you need to visit by checking out The London According to Benedict Map!
The London Underground – “The Tube”
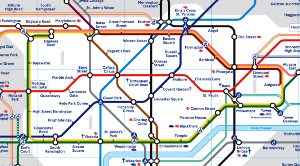
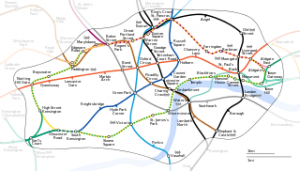
The tube is probably the most well-known of the London public transport systems. The tube map is one of the most recognisable patterns; one thing you need to remember is that it is a stylised design, it doesn’t accurately represent the layout of the tracks, or in some cases the distance between stations. So if you just want to go “one stop” on the tube, double check the map to see if it’s quicker to walk there!
An example of the stylised Zone 1 Tube map vs. a more accurate representation of the stations geographic locations:
 Extract from the TFL PDF map (for visual comparison only) |
 Source: Wikimedia Commons |
Download all of the latest travel maps from the Transport for London (TFL) website:
https://tfl.gov.uk/maps
The Tube system is divided into Zones 1 to 9, with the majority of the Central London being contained within Zone 1. The higher the Zone number, the further away it is from the centre. The Zone number affects the ticket price, in terms of distance travelled.
Buying Tickets
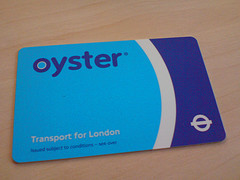
One of the easiest ways to ensure you always have a ticket to travel within London is by having an “Oyster Card”. This is a credit card style ticket, which you can top up with credit. You can top up manually at stations, using the automated machines, or set up an auto-top up via the TFL Oyster website.
You use these cards by “touching in” and “touching out” of the stations used for your journey (see Using Tickets, below).
You can order an Oyster card in advance, by signing up for an account with the TFL Oyster website, and requesting one to be posted to you, or you can obtain one from any tube or rail station within London, and many local stores displaying the Oyster logo. If you obtain a card from a station or a store, you will still need to register with the website to manage your account and payments.
The Oyster card requires a £5 deposit to obtain the card, which is refundable if you no longer require it. You will need to return the card to Transport for London (see the website for instructions). Each single journey (per Adult) is between £1.70 and £3.40 within the central London area, but can be more depending on the outer Zones! But there is a daily cap on prices, so you won’t pay more than necessary within a single day (see below).
If you have a “contactless” Credit or Debit card, you can also register this card with the TFL Oyster website, and use it in the same way as an Oyster; except, of course, that you won’t need to top up the credit.
Paper tickets are available as usual, but they end up being more expensive: e.g. a single Adult ticket is £4.80.
PRO TIP – Prevent “card clash”: If you have both an Oyster card and another contactless payment card stored in the same wallet, I suggest that you remove the one you wish to use from your wallet when you touch in and out. Many people just touch their wallet to the pad (which works fine!) but sometimes you get “card clash” (https://tfl.gov.uk/fares-and-payments/oyster/using-oyster/card-clash) and more than one card may get charged for your journey. TFL will refund when this occurs, but it’s easier to just try and avoid it.
Pay as you go Oyster allows you to be flexible with your journeys. There’s a daily cap on fares so you never pay more than £8 (Zones 1-4) or £8.80 (Zones 1-6) in a single day. The daily cap applies to travel on the tube, DLR (Docklands Light Railway) and buses; and other travel services which accept Oyster.
“Travel Cards”
If you know you’re going to be doing a lot of journeys over the course of a week (or longer), you can buy a “travel card” via the Oyster website, or via the ticket machines at the stations. This will be a set price for that time period, and works out slightly cheaper per day. This virtual travel card is then applied to your account and you will only pay that set price during the validity period. The Oyster card switches back to a pay as you go system once the travel card has expired. You don’t have to have separate cards for these ticket types; it’s all on the one card.
 Source: Flickr |
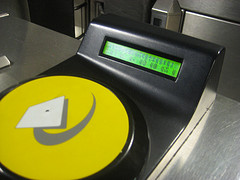
 The Oyster Touch Pad. Source: Flickr |
Using Tickets.
“Touching” In and Out with Oyster or a contactless payment card:
Some stations have barriers, others do not. When using your Oyster or contactless, you MUST remember to touch the card to the yellow pad at both stations when you enter AND when you exit. This is easy for the stations that have barriers at either end but if there is no barrier at the station, then these pads are situated somewhere along the station walkways. You have to seek them out.
Failing to do this will mean that your fare is calculated incorrectly. For example, if you forget to touch the pad on entry, but you do remember to touch out, the system will consider that the beginning of your journey, rather than the end, which may cause problems getting through barriers and starting your next journey. Similarly. If you forget to touch out, the fare will be calculated at the next station you visit – which might be further away, or on a different day!
Conductors on the train will sometimes ask to see your ticket, they have a scanner which will read your Oyster, or other card, to ensure it has been “validated” for travel.
Using Paper Tickets:
Paper tickets can be bought and used as you would anywhere in the world. To gain entry through a barrier, insert the ticket into the slot at the front, and it will pop out of the top, and the barrier will open. If you have a ticket for a “single” journey rather than a return, then the machine will likely “eat” your ticket at the final barrier on your way out.
How to Navigate the London Underground Tunnels:
Once you’re inside a tube station, it’s pretty easy to find which platform you need to stand on. Most platforms only go in one direction, so if you’re travelling south, go to the southbound platform for that line. Each of the platforms will have a map detailing what routes come and go through there, specific to that platform and station. There are constant updates on the platform, giving you the wait in minutes of the next train, and it’s final destination.
When walking to your platform, there’s usually only one way you can go, particularly down in the tunnels. Follow the maps on the walls!
There are one or two irregularities with some of the tube lines, most notably the Northern Line (black on the map) which has two “branches”. Some stations are only on either the East (via Bank) branch, or the West (via Charing Cross) branch. For example, if you get on the Northern Line at Euston station, which services both branches, you have to make sure you get on the right train.
Exiting the tube stations:
Some stations have multiple exits, which send you to particular roads, intersections, or tourist attractions. Check all the signage and maps before you leave the station, if you’re unsure.
PRO TIP – What if you get lost? Luckily there are maps all over London. In the event that you get turned around in the maze of streets, one of the best things for you to find is the closest Tube Station, or a local tourist attraction. From there you can find a route back to where you need to be. If you can’t find one of these – hail a black cab!
Buses:
All London buses are now cash free, which means you must pay for a journey with either a contactless payment card, or an Oyster card. You only need to touch in upon boarding the bus and you will be charged a single journey fare. The price is £1.50 for each single journey
Taxis:
If you want to get around by using taxis or minicabs, stay safe by ensuring you book with a reputable company. Use one of the CABWISE apps:
https://tfl.gov.uk/modes/taxis-and-minicabs/taxi-and-minicab-apps?intcmp=4210
Emirates Air Line:
Want to get across the Thames from around the London ExCel area to the O2 Arena? Then take a trip on the Cable Cars! You can use Oyster on here too. The Emirates Air Line goes from the Emirates Royal Docks (nearest tube station: Royal Victoria, on the DLR) to Emirates Greenwich Peninsula (nearest tube North Greenwich, on the Jubilee line).
https://tfl.gov.uk/modes/emirates-air-line/
Getting to the Barbican Theatre
The Barbican is located between the tube stations Barbican and Moorgate.
If you alight at Barbican station, there is a bit of a walk to get to the theatre up and down stairs and along a walkway. The theatre and other points of interest are sign posted along the way.
You can also get to the Museum of London from here, along the same walkway (sadly the Sherlock exhibition has finished, but it’s an excellent – and free! – museum with tons of history and info).
If you alight at Moorgate station, you again have a walk to get to the theatre itself, and it appears to be a bit further away than the Barbican station.
I’ve not travelled this way myself, so I assume there will also be sign posts to get you to the theatre (comments and corrections welcome!).
Useful links:
Main Transport for London Website
Oyster information and website
What is Oyster?
Sign in to your Oyster account – and find even more information
Oyster “card clash” information
Pay as you go Oyster & capped fares
CABWISE – approved taxis and minicabs
Emirates Air Line
Barbican Location
Museum of London
For book reviews, movies and events reviews, plus other crafty antics by Jules, visit crownjulesrules.com, crownjulesrules on Facebook, and follow me on twitter @crownjulesb. Or email info@crownjulesrules.com.


Write a comment
You need to be logged in to leave a comment.